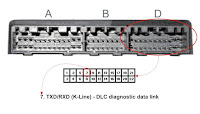
Direct wiring (swapped Honda ECU, etc.)
- Use the following references to wire the scanner directly in case you swapped the stock ECU with an OBD1 ECU (all versions) or with an OBD2 A/B ECU (JDM, EU versions etc. that originally had the 3 pin diagnotics plug, not just any OBD2 ECU will work, e.g. US versions did not have the 3 pin plug thus are not compatible!), in a car that doesn't have the 3 pin DLC connector available in the harness.
- Communication - connect to the communication pin (check that the pin provides 5 Volts max, higher voltage will destroy the bluetooth module) designated as "TXD+RXD" or "K-Line" - i.e. DLC diagnostic data link:
OBD1 ECU -> pin D7 (see OBD1 ECU pinout)
OBD2 ECU -> (must not use versions that did not have the 3 pin diagnostics plug! e.g. US versions, etc.) refer to a service manual (e.g. ECU P73 pin C8)
(OBD2 US versions are incompatible, can be identified by letter "A" in the last 3 letters of the ECU id: 37820-P**-A**)

pin-out diagram for A-B-D 3-plug OBD1 ECU version - Power - connect to any 12 Volts power source (alternative power feed option)
- Ground - connect to any ground (chassis ground, etc.)
- Communication - connect to the communication pin (check that the pin provides 5 Volts max, higher voltage will destroy the bluetooth module) designated as "TXD+RXD" or "K-Line" - i.e. DLC diagnostic data link:
Wiring harness (OBD2A/B to OBD1 conversion, full engine and ECU swap, etc.)
- make sure that the communication 5 V wire in DLC diagnostic connector is correctly connected to the ECU communication pin by tracing it manually using multimeter's continuity test
- there are a couple of pins that output 5 volts, tracing the wire physically and making sure it's the correct one is mandatory, because it can read 5 volts even if it's connected to a wrong pin
Power management
(Default) permanent power
- the scanner stays permanently powered at all times when connected to the DLC port, even if the ignition is switched off, making the scanner drain an average current 4.9 mA. This is not an issue if you drive daily. However if you leave the vehicle sit for a longer period or your battery lifespan is ending, the scanner might contribute to quicker battery drain
- the scanner stays permanently powered at all times when connected to the DLC port, even if the ignition is switched off, making the scanner drain an average current 4.9 mA. This is not an issue if you drive daily. However if you leave the vehicle sit for a longer period or your battery lifespan is ending, the scanner might contribute to quicker battery drain
Custom ignition switched power
- with a little bit of electrician skill you can rewire your DLC connector to an ignition switched power source which will power the scanner only when the key is either in ACC or IGN position, in this example using a mini fuse tap (available for purchase from other vendors) at fuse Nr.27 in under-dash fuse box (cigarette socket power)
- if you don't want to cut the wire, you can simply disassemble the DLC connector and remove the middle female pin and isolate it, then proceed as described in the 3rd option below. When doing this mod, MAKE SURE there is no more power in the DLC connector! Using two power sources (DLC connector power source + soldered external wire to another power source) simultaneously may permanently damage the scanner and blow fuses!
- with a little bit of electrician skill you can rewire your DLC connector to an ignition switched power source which will power the scanner only when the key is either in ACC or IGN position, in this example using a mini fuse tap (available for purchase from other vendors) at fuse Nr.27 in under-dash fuse box (cigarette socket power)
External power - OBD1 vehicles without power source in the DLC diagnostic connector
- some OBD1 cars ('92-'95) don't have any power source in the DLC diagnostic connector (3 pin style connector with only two wires connected to it, middle pin and wire are missing). In this case you have to wire the scanner as described here.
(Please note that you can NOT use this guide for OBD0 cars, '88-'91, some models until -'93; they have only the 2 pin SCS service check connector available, which does not support diagnostic data transmission) - 1st step:
prepare a wire on the scanner side
- 2nd step:
connect the prepared wire to the red wire on a cigarette socket male plug (available for purchase from other vendors)
{
OR, for hidden installation, splice the prepared wire directly to the wire powering the cigarette socket (12 Volts), behind the cigarette socket, or alternatively, connect the prepared wire using a mini fuse tap (available for purchase from other vendors) to tap the power at fuse Nr. 27 (cigarette socket power) in under-dash fuse box}
- some OBD1 cars ('92-'95) don't have any power source in the DLC diagnostic connector (3 pin style connector with only two wires connected to it, middle pin and wire are missing). In this case you have to wire the scanner as described here.


